Saturday, 29 July 2017

Install ADB & SDK platform tools for fastboot functionality

1. Open any web browser.
2. Search "sdk platform tools" on google.
3. Open the link that shows something like "developer.android.com".
4. On left side you will find "SDK Platform Tools" under "Release Notes".
5. Click on
6. check mark "I have read and agree with the above terms and conditions".
7. Click on "DOWNLOAD SDK PLATFORM-TOOLS FOR WINDOWS".
8. It will download the "Platform-Tools" ZIP file.


9. Search "google usb drivers" on google.
10. Open the link that shows something like "developer.android.com".
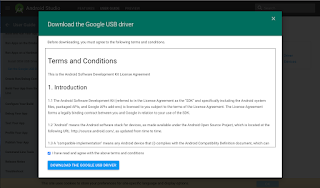
11. Click on

12. check mark "I have read and agree with the above terms and conditions".
13.  Click on "DOWNLOAD THE GOOGLE USB DRIVER".
14. It will download the "Google USB Driver" ZIP file.


15. Open the folder where you have downloaded these files.
16. First extract "Platform-Tools" to "Local Disk C".
17. It will create a "Platform-Tools" folder in the 'C' Drive.
18. Now extract "Google USB Driver" to the "Platform-Tools" folder created in 'c' Drive.
19. Open "Platform-Tools" folder and copy its path.
20. Right click 'This PC' icon on desktop and select 'Proerties'  and go to >> 'Advanced system settings'
21. 'System settings' window will pop up.
22. Click on 'Environment Variables' and under 'System variables' double click on 'Path' and click 'new', now paste the of 'Platform-Tools' folder that we have copied.
23. apply these settings by clicking 'OK'.
24. Open 'command prompt' to check whether 'adb' and 'fastboot, are installed.
25. Type 'adb' and hit return/enter key >> all the adb command will be displayed.
26.  Now type 'fastboot' and hit return/enter key >> all the fastboot command will be displayed.
27. adb and fastboot are properly installed on our pc.


                       ...YOU CAN WATCH VIDEO FOR FURTHER HELP...                         


Wednesday, 11 January 2017

Share files between Ubuntu and Windows 10/8.1/7 (32bit / 64bit)

# Follow These Steps to share files between Ubuntu and Windows:


1.       Install samba on ubuntu.
Open terminal and type the following command :-
                   “sudo apt-get install samba”
 enter admin password
 type “Y” when it asks to continue.


2.        Create a new folder to share.
                          Rename it like- Home Cloud
             Right click and select properties > local network share 
             Check mark:- share this folder and allow others to create and delete files in this                              folder
             Hit create share > add the permissions automatically


3.       Now open Home Cloud folder and create new document and name it “Test Network Connectivity”.(we are creating this document to check whether our folder has been shared successfully or not)

4.       Get the ip address of ubuntu.
       Open terminal and type the following command :-
                          “ifconfig”
Copy and keep  the value of “ inet addr” [it will look like: 192.168.1.34] (it is actually the ip address of our system with Ubuntu)


5.       Now we have to create user and set password for shared folder.
                   Open terminal and type following command :-
            Sudo user add –M –N –g   sambashare home

                        Now it will ask for admin password.
      6.      Now set password for user “home” of shared folder.
               Open terminal and type the following command :-
“sudo smbpasswd –a Home”
now it will ask for admin password
New SMB password : (type the password that you want to set for the user “home” of the shared folder)
Retype new SMB password:(retype the password to confirm)
User Home will be added to the shared folder.


7.       Now access shared folder from windows 10 pc.
Go to start menu ant open “run”
And type the following:-  \\192.168.1.34
Hit enter

It will show you the shared folder “Home Cloud”
Open it and you will be able to see the document named “Test network connectivity”


8.       You may also create a text document from windows 10 pc and rename it “successfully connected”.
            Which can also be viewed from ubuntu

9.       Create a shortcut to the shares folder so that you don’t need to enter the ip address of ubuntu  every time to access the shared folder.

Open this pc > Computer (in the ribbon) > Map network drive


In Map network drive window type the following in folder:- \\192.168.1.34\Home Cloud
Check mark reconnect at sign-in and hit Finish


Now you will be Able to see Home Cloud Drive in This PC window


10.   Now finally check if file sharing is working  with the Drive that we have created in This PC window.

                       ...YOU CAN WATCH VIDEO FOR FURTHER HELP...                         


Friday, 23 December 2016

How to install java on Windows 7/8/8.1/10 ( 64bit/32bit)

# Follow These Steps To Install Java Manually On Windows:

1.  Open any browser and go to google.com
2.  Search for java jdk
3.  Open the official orracel link
4.  Select java platform (JDK)
5.  Accept license agreement and download the file for Windows x86 (for 32bit) or Windows x64 (for 64bit).
     (I am demonstrating here for Window x64)
6.  Open the downloaded folder and run the jdk installer.
     (leave everything at default and install java jdk)
7.  After the installation go to: This Pc > Windows (C:) > Program Files > Java
8.   You will see two folder JDK (java development kit) and JRE (java run-time environment)
9.   Open jdk and goto bin folder and copy its path.
10. Open this Pc and right click on the blank area and select properties > advanced system settings
11. Under advanced tab select environment variables.
12. Go to system variables and select path and hit edit.
13.  In 'Edit environment variable' window hit edit text button
14.  Edit system variables window will appear. Under this window select variable value and go to the end of the  variable value and put a ";" (semicolon) and paste the path of the jdk bin folder that we have copied.
15.  Now add the path of jre bin folder similarly and hit: OK > OK > OK.
   
       (Now check whether java has been installed on the pc properly or not)

16.  Right click the start menu button and open command prompt (Admin).
17.  Type "javac" and hit enter.
        It will show you all the commands of java and what it does.
      (This verifies that java has been installed on the pc properly)

......You can watch video for further help......


Tuesday, 13 December 2016

CREATE YOUR OWN BLOG

#STEPS TO CREATE A BLOG...

Blog is a personal space where we can express our views on the topic of our liking.

Follow these steps to create your own blog and become a blogger-
1. Navigate to google.com and login to your google account (if not then create a new account).
2. Select google apps tab (looks like 9 dots), scrol down and select blogger.
3. You will see 'create a new blog' button in the center of the page click it.
4. You will see a window asking to fill title of your blog, address of your blog, select template.
5. After that you will have your own blog...

!!!!NOW YOU CAN COMPOSE POST AND PUBLISH IT ON YOUR BLOG !!!!
...You can watch video for further help...